Collect a small breast milk sample (about 0.3ml), by hand expression, for scanning.
* Each breast should be sampled and scanned separately.
* It is recommended to collect the sample before breastfeeding and not directly after feeding.
* Milk can be collected directly into the scanner chamber, or through a clean spoon or container. Do not let sample wait in an open container as it can evaporate and reduce reliability of the scan.
* It is recommended to screen fresh samples! If needed, the sample can be kept up to 2h in RT in a closed container. If scanning refrigerated sample, (it is very important to bring the sample to room temperature before scan).
* In the first hours after birth – and in the first two days it may be difficult for you to collect the minimum sample volume. In such case you can either combine several attempts, or mix right and left samples.
If you use any nipple cream, wipe ointment leftovers from the nipple and wash with running water, before milk collection.
Do NOT dip the scanner in a feeding container.
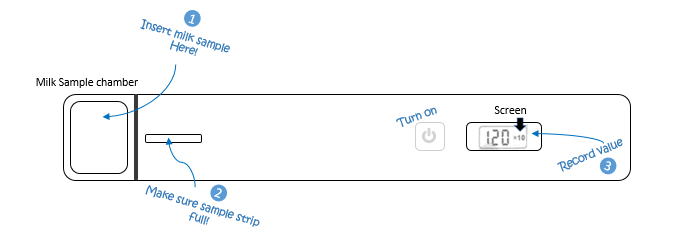
• Place the device horizontally on a clean surface with the power button and display panel facing up. Turn-on the MyMilk Scanner, by pressing the On button on the scanner device.
• Insert the milk sample into the milk sample chamber (slowly).
• Make sure that the inner sensing chamber is filled (when the sample emerges through the slit in the milk sensing chamber). If the sensing chamber is not filled, the result will not correctly represent the sample.
* Colostrum can stick to the walls of the sample chamber, and you may need to gently agitate the scanner in order for the liquid to glide into the inner chamber. Make sure the sample emerges through the slit in the sensing chamber.
• Before Recording the measurement, wait about 3 seconds until the number stabilizes.
• Take a good look on the screen when you take a measurement. In some cases (specially in early milk, but not only), you will have x10 mark in the screen. This means you need to add a zero to the number you record in the App (e.g. to the example shown, record 1200, and not 120).
• In the App, go to My Day screen, and press right/Left scan ⃝ task, and Record the value on the screen at the My Scan screen. SAVE the reading.
• A milk sample should be read from each breast separately.
Wash chamber between reading under running water as instructed below. Make SURE to dry well, with NO drop leftovers. Repeat on all steps for the other side.
• Go to My Insights screen to get your milk maturation status and insights.
• Discard milk sample to sink, and wash chamber as instructed below with tap water only (Do Not use soap, or hot water). Do not let the milk stay in the chamber, it may dry and affect your device accuracy.
Do not use the milk sample that was used by the scanner for any use, Do not feed with this sample.
If the number on the scanner do not stabilize it may indicate some problems. Few causes can be: too small sample size, bubbles, non-homogenized sample, sample not in room temperature, chamber leaking. Tray again and control these factors. If this is small jumps of the last digit this is OK.
Still not working? follow our troubleshooting guide, or contact us directly via the My Care Team Screen > MyMilk Tech support (opens chat).
JUST CONTACT US IF YOU HAVE ANY CONCERN via the App chat at My Care Team screen, or via contact@mymilklab.com
SYSTEM IS NOT INTENDED FOR DIAGNOSIS OR TREATMENT OF ANY MEDICAL CONDITION, AND THE INFORMATION PROVIDED IS NOT A MEDICAL ADVICE. IN ANY CONCERN ABOUT YOUR BREASTFEEDING, YOUR BABY OR YOUR OWN HEALTH, CONTACT WITH LACTATION CONSULTANT OR YOUR HEALTHCARE PROVIDER.
Read our troubleshooting guide for common issues with the scanner or the App. We are working hard to improve it, but in the mean time…